Scientific Software
Technologies Center

TRFA Data Processor Advanced
Global analysis software of
Time Resolved
Fluorescence and Anisotropy data
Measurements Database
User
Manual
SSTC contacts:
sstcenter.com; info@sstcenter.com
Measurements Database Content
- Using Measurements Database
- About Measurements Database
About Measurements Database
Measurements Database, designed for economical storing and easy managing of experimental data, provides convenient and fast way of searching and retrieving information. This software let one to get rid of a great amount of paper needed to keep information about the measurements as well as to avoid routine manipulation with computer files, folders, etc.c.
Database consists of several tables with the automatically supported relationships between them.

Each record in the Observations table describes particular measurement and contains such experimental parameters as Sample Position, Start Time, Duration, etc, as well as array of the measured data. Several records from the Observations table are related to one record in the DataSets table (relationship "many-to-number"). This relationship reflects the experimental configuration when measurements of the same sample under the same external conditions are being performed in series and some files such as Reference or Scatter may belong to a number of DataSets. In this case, certain number of particular measurements should be collected into a group corresponding to the investigated object. Table Relation is used to realize the "many-to-number" relationship between Observations and DataSets tables. It
contains pairs of Observations and DataSet identifiers. Information, which is the same for every measurement within one group (like Guest, Sample, Date), is stored in the DataSets table as one record. Such relationship between the Observations table and the DataSet table, besides compressing of the information, allows to retrieve the whole set of measurements by selection only one record in the DataSet table. All parameters related to the DataSet and described all measurements within one group are stored in the Parameters table. This table is related to the table DataSets by "many-to-one" relationship.
The ExtParameters (External Parameters) table is used for storing External parameters such as Temperature, Concentration and so on. Table ExtParameters is related to the DataSets table by "many-to-one" relationship, so it is possible to link a number of External parameters to the particular DataSet. Additional reason for constructing ExtParameters and PNames tables is the possibility of visualization of the fit parameters as a function of a particular External parameter. If a series of measurements, for example, at Temperature = 10, 20, 30, … degrees above zero was performed, one has to add a parameter 'Temperature' in the PNames table (if this parameter had not been entered before) and add a record in the ExtParameters table with the name 'Temperature' and Value = 10 and so on. The PNames table was designed in order to avoid mistakes while writing names of parameters. One should first enter the name of a new Parameter in PNames table than choose it from a drop-down list in the ExtParameters table.
There are two auxiliary tables in the database: table Guests and table Samples. The first one contains information about person or organization who orders measurements, and the second one provides the detailed information regarding the explored sample. Both tables are related to the table DataSets by "one-to-many" relationship. Such a configuration makes possible to list all measurements performed for a particular person or a particular sample. At the other hand, all information about particular experiment (including personal information and detailed information about the sample) becomes available just by selecting one record in the DataSets table.
The main features of the database are:
- fast storing the series of files in the Database;
- convenient representation of the stored data;
- extensive possibilities for searching and filtering information;
- build-in two-dimensional graphical pre-viewer of measured data;
- form view and datasheet view of the tables;
- possibility to create new sets of tables allowing to keep data in different folders or computers within the local network, etc, and easily switch between them at run time;
- import and export of the experimental data and other information;
- quick deleting all records from the selected table;
- packing tables after deleting in order to reduce the size of the tables;
- checking and repairing the tables;
- generating and printing the reports on the base of the selected records.
Database supports data integrity and validity. All information concerning the defined object is stored in one record in table. The mechanism of data integrity forbids deleting a record from one table which is linked to the records in the other tables. Data validity guarantees that values stored in the tables are always valid by the checking of the range and type of the entered data. Database is protected from the accidental changing or deleting of information by the default forbidding of editing.
Database avoids data redundancy: each record has only one instance. It means that it is not required to enter information into the tables, if the same information is already stored in the database. User can just establish the relation between the entered and stored information. This feature is especially useful when one needs to update records in the database. The correction should be done only once at one point (where the changed information is stored) and then this update will take effect in all records which are related to the selected one.
Database provides extensive possibilities for searching information. The fastest way how to find a record by a specific field is by typing first symbols of this field in a special window. Cursor moves to the record with the field, which contains symbols matching the typed ones. The possibility to sort any table by any field is also supported.
User may also interactively create filter with complex conditions in order to decrease the selected number of records.
Such operations as looking through the records, deleting records, editing information are provided by Database Navigator.
Starting Measurements Database
Starting Measurements Database can be started via
1. Start button on the Windows Task Bar:
• Go to the Programs/FFS Data Processor/ and click the Measurements Database item;
•
Choose Run and specify the path to TRFAMDBAdv.EXE;
2.
Windows Explorer:
•
Locate and double-click the TRFAMDBAdv.EXE file (if you have performed a default installation, this file is located in \Program Files\SSTC\TRFADP Advanced\Bin).
Main Window
Main Window consist of the following components:
•
Menu
•
Toolbar
•
DataSets panel
•
Files panel
•
Additional Parameters panel
•
Status Bar
An example view of the Database Main Window is given in the following figure:

Menu and Toolbar provide quick way to invoke the commands of the application.
Data Sets panel represents information related to the set of files (DataSets table) and Files panel represents information for each file individually (Observations table). For more information about structure of the Database see About Measurements Database.
Status bar, which is a horizontal area in Measurements Database below the Files Panel, provides information about the current state of application and any other contextual information. Alias of the current Database is displayed in the right part of the Status bar.
Menu
Main menu consists of following several popup items:
Items Description

File Contains menu commands for managing tables and exchanging data between databases.
Wizards Contains menu commands for importing data.
Tables Contains menu commands for opening tables.
Find Contains menu commands for finding information.
Sort Contains menu commands for sorting tables.
Reports Contains menu commands for previewing and printing automatically created reports.
Tools Use the commands of the Tools menu for performing some service database functions.
View Contains menu commands for managing the view of the opened tables and other objects.
Help Contains menu commands for accessing the online Help and information about the copyright.
File menu
Use commands of the File menu for managing tables and exchanging data between databases.
The File menu contains the following commands:
Commands Description
New Tables Opens New Database dialog box to create a new empty Database (set of tables) allowing to keep data in different folders or computers within the local network. One have to specify the Alias for this Database during this operation.
Link Tables Opens Link Tables dialog box for switching between Databases at run time.
Import from Database... Imports DataSets(s) with all supplementary information from the selected database to the current Database. Opens Import/Export Data form to select the Database and DataSet(s).
Export to Database... Exports DataSet(s) with all supplementary information from the current database to the selected Database. Opens Import/Export Data form to select the Database and DataSet(s).
Analyse current DataSet Sends the current dataset to the
TRFA Data Processor Advanced.
Analyse selected DataSets Sends a number of selected datasets to the
TRFA Data Processor Advanced.
Exit Finishes the work with Measurements Database.
Tables menu
Use the commands of the Tables menu for opening tables.
The Tables menu contains the following commands:
Commands Description
Guests Opens Guests Form.
Samples Opens Samples Form.
Observation Files Opens Files Form.
Find menu
Use the commands of the Find menu for finding information.
The Find menu contains the following commands:
Commands Description
Quick Search Displays a search box for the corresponding field. If you want to find quickly the necessary record you should type the first few characters and press Enter. In this case the application will automatically select the first record that contains at the beginning the characters, which correspond to the typed ones. For the Numeric, Logical and Data/Time fields you should type the whole value for the correspondent field. To close the search box, press key Esc.
Filter Opens Filter dialog box that allows creating the filter that can be applied to the selected table. If this filter is applied, the only table records that correspond to the filter criteria will be displayed.
Filter by selection Filter a table by a selected field. If the filter is applied, the only records that contain selected text are displayed.
Clear filter Clear filter expression
Remove Filter Removes Filter from the selected table (without clearing the filter expression).
Sort menu
Use the commands of the Sort menu for sorting tables.
The Sort menu contains the following commands:
Commands Description
Ascending Sorts records of the table in ascending order by the selected field.
Descending Sorts records of the table in descending order by the selected field.
Reports menu
Use the commands of the Reports menu for setting the page setup, previewing and printing automatically created reports.
The Reports menu contains the following commands:
Commands Description
DataSets Report Previews the Report. Opens Report Options dialog box to set the filter on the DataSets table for selecting the records which will be included into the Report.
Wizards menu
Use the commands of the Wizards menu for importing data.
The Wizards menu contains the following commands:
Commands Description
Import Data Set Wizard Opens Import Data Set Wizard. It helps to import a set of files that forms a DataSet.
Import N Column Data Wizard Opens Import N Column Data Wizard. It helps to import a number of files written in columns and form a number of DataSets.
Import By Template Wizard Opens Import By Template Wizard. It helps to import a set of files that forms a DataSet. The sequence of file types are controlled by a special template.
Import PHD (PicoQuant) data Wizard Opens Import PHD (PicoQuant) Data Wizard. It helps to import either single or a number of PHD files and form one or many DataSets.
Tools menu
Use the commands of the Tools menu for performing some service database functions.
The Tools menu contains the following commands:
Commands Description
Pack Table Reduces size of a table by releasing any free space. Packing can be used for repairing the table, because the table is restructured during this operation. Opens Select Tables dialog box to select the table.
Check and Repair Tables Checks all tables and repairs them if they are corrupted. Packing tables can be used also for repairing the tables.
Empty All Tables Deletes all records from all tables.
Preview Graphs Opens Preview Window for two-dimensional preview of experimental data.
Edit Import Template... Opens Template Editor dialog box to set a default template, preview or edit templates.
Options... Opens Options Dialog box to set Borland Database Engine internal variables.
Commit Changes Ends the default transaction and reconnects the Database. This command prevents you from loosing your changes you made after the abnormal program termination.
View menu
Use the commands of the View menu for managing the view of the opened tables.
The View menu contains the following commands:
Commands Description
As Form Displays the table as form.
As Datasheet Displays the table as datasheet.
Select DataSets Opens Select DataSets dialog box to select a number of DataSets by different criteria.
Help menu
Use commands of the Help menu to access the Help and get information about the copyright.
The Help menu contains the following commands:
Commands Description
Help Contents Opens Help topic contents.
About Displays the copyright and version number for Measurements Database.
Toolbar
The Toolbar is a row of buttons at the top of the Main window which represent application commands. Clicking one of the buttons is a quick alternative way to choose a command from the menu. Buttons on the toolbar are activated and deactivated according to the state of the application.


The Toolbar has short Help Hints. Help Hint is the pop-up text that appears when the mouse pointer passes over a toolbar button.
Button "View Table as Form"
This button views the table as form.
Button "View Table as Datasheet"
This button views the table as datasheet.
Button "Analyse current DataSet"
This button sends current DataSet to the
TRFA Data Processor Advanced for the analysis.
Button "Analyse selected DataSets"
This button sends a number of selected DataSets to the
TRFA Data Processor Advanced for the analysis.
Button "Import Data Set Wizard"  This button opens Import DataSet Wizard to import a number of files and create a ready for analysis DataSet with all necessary settings.
Button "Import N Column Data Wizard"
This button opens Import NColumn Data Wizard to import a number of measurements stored in columns in one file and create a number of ready for analysis DataSets with all
necessary settings.
Button "Import by Template Data Wizard"
This button opens Import byTemplate Data Wizard to import a number of files and create a ready for analysis DataSet with all
necessary settings. It uses a predefined template for quick setting of file properties such as Type and Polarization.
Button "Select DataSets"
This button opens Select DataSets by criteria dialog to select a number of Datasets.
Button "Quick Search"
This
button displays a search box for the selected field. If you want to find quickly
the necessary record you should type the first few characters and press Enter.
In this case the application will automatically select for you the first record
that contains these characters at the beginning. For Numeric, Logical and
Data/Time fields you should type the whole field value. To close the search box
press key Esc.
Button "Filter"
This button opens Filter dialog box that allows creating the filter that can be applied to the selected table. If this filter is applied, the only table records that correspond to the filter criteria will be displayed.
Button "Ascending Sort"
This button sorts records of the table in ascending order by the selected field.
Button "Descending Sort"
This button sorts records of the table in descending order by the selected field.
Button "Filter by selection"
Filter a table by a selected field. If the filter is applied, the only records that contain selected text are displayed.
Button "Clear Filter"
Clears the filter from the table.
Button "Help"
This button opens Help topic contents.
Database Navigator
Such operations as moving from one record to another, deleting records and editing information are supported by the Database Navigator.


Navigator button "First"
This button moves cursor to the first record.
Navigator button "Previous"
This button moves cursor to the previous record.
Navigator button "Next"
This button moves cursor to the next record.
Navigator button "Last"
This button moves cursor to the last record.
Navigator button "Insert"
This button inserts new empty record.
Navigator button "Delete"
This button deletes the current record.
Navigator button "Edit"
This button switches the state of the table in edit mode. After updating information it is possible to save changes by pressing Post button or cancel changes by pressing Cancel button.
Navigator button "Post"
This button saves the current record.
Navigator button "Cancel"
This button cancels changes.
Navigator button "Refresh"
This button refreshes the information in the table. Valuable in multiuser application when several users work with the Database simultaneously.
DataSets panel
DataSet panel represents information stored in the DataSets table.
An example view of the DataSet panel is given below:
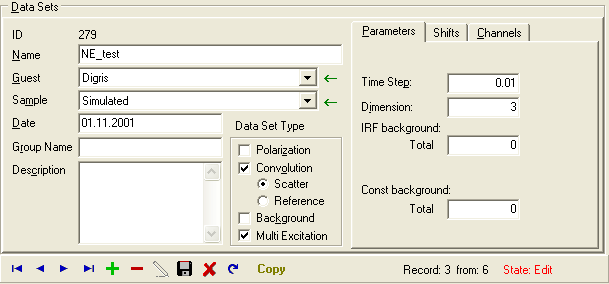
Name of the DataSet, information about the Guest (person, who requests the measurements) and sample, date of measurements, main parameters as well as short description of the measurement, are displayed in this panel. It is possible to perform all manipulation with DataSets table with the help of Database Navigator which is placed in the bottom part of the DataSet panel. In this part you can see
a number of the current record, a number of all records and a current state of the table. Button Copy allows you to copy all fields from the previous record to the current one (with all related parameters).
It is not necessary to type the name of Guest or name of sample each time when you create a new DataSet. It is possible to choose it from the drop-down list. To add new Guest one should press arrow button in right part of Guest combo box. This button is enabled only in Edit or Insert mode. New information for the sample can be entered in the same way.
DataSets table can be viewed as a form view or datasheet view.
All actions under DataSets table are collected in the local menu.
Button "Copy" copies all fields from the previous record to the current record as well as all related parameters from the Parameters and ExtParameters tables. It is enabled in
the Edit mode.
Button "Insert new Guest" opens Guests Form to add new Guest. Name of the Guest will be pasted in Guest combobox after closing the form by pressing Insert button. It is enabled in
the Edit mode.
Button "Insert new Sample" opens Samples form to add new Sample. Name of the Sample will be pasted in Sample combobox after closing the form by pressing Insert button. It is enabled in
the Edit mode.
Local menu of the DataSets panel
Items Description
Insert Inserts a new empty record in the table (create empty DataSet).
Delete Deletes current record.
Edit Switches state of the table in edit mode.
Post Saves current record in the Database.
Cancel Cancels changes.
Refresh Refreshes the information in the table. Valuable in multi-user application when several users work with the Database simultaneously.
Copy from previous DataSet Copies all fields from previous record to current record.
Add new Guest Opens Guests Form to add new Guest. Name of the Guest will be pasted in Guest Lookup after closing the form by pressing Insert Button.
Add new Sample Opens Samples Form to add new Sample. Name of the Sample will be pasted in Sample Lookup after closing the form by pressing Insert Button.
Analyse current DataSet Sends the current DataSet to the
TRFA Data Processor Advanced for the analysis.
Analyse selected DataSets Sends a number of selected DataSets to the
TRFA Data Processor Advanced for the analysis.
Generate Report Generates the report based on the selected record.
Sort Sorts the table.
Find Record Allows to set the filter on the table and to search the information by typing the first few characters.
Select DataSets by criteria Opens Select DataSets by criteria dialog to select a number of Datasets.
View Allows to change the view of the table.
Sort submenu
Sorts the table.
Items Description
Ascending Sorts records of the table in ascending order by the selected field.
Descending Sorts records of the table in descending order by the selected field.
Find Record submenu
Allows to set the filter on the table and to search the information by typing the first few characters.
Items Description
Quick Search Displays a search box for the corresponding field. If you want to find quickly the necessary record you should type the first few characters and press Enter. In this case the application will automatically select the first record that contains at the beginning the characters, which matched the typed ones. For the Numeric, Logical and Data/Time fields you should type the whole value for the correspondent field. To close the search box, press key Esc.
Filter Opens Filter dialog box that allows creating the filter that can be applied to the selected table. If this filter is applied, the only table records that correspond to the filter criteria will be displayed.
Filter by selection Filter a table by a selected field. If the filter is applied, the only records that contain selected text will be displayed.
Clear Filter
Clears the filter from the table.
Remove Filter Removes the filter from the table
without clearing the filter expression.
View submenu
Allows to change the view of the table.
Items Description
View As Form Displays the table as Form.
View As Datasheet Displays the table as Datasheet.
Additional Parameters panel
This panel represents
additional parameters of the current DataSet (displayed in DataSet panel).
An example view of the Additional Parameters panel is given below:
Additional Parameters panel consists of the following pages:
Experimental parameters page
External parameters page
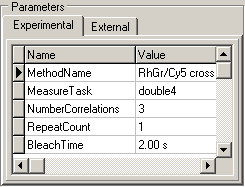
Experimental parameters page
This page displays experimental parameters (parameters of equipment, etc.) of the current DataSet stored in the Parameters table.
An example view of the Experimental parameters page is given bellow:
All actions under Experimental parameters table are collected in the
local menu.
External parameters page
This page displays external parameters of the current DataSet stored in the External parameters table.
External Parameters table are used for storing such parameters as Temperature, Concentration and so on. Additional reason for using External Parameters is the possibility of visualization of the fit parameters as a function of a particular External parameter (for example, measurements were done at Temperature = 100C, 200C, 300C, …) .
An example view of the External parameters page is given bellow:

Field Name is the lookup field. It lookups the information from the PNames table.
All actions under External parameters table are collected in the
local menu.
Local menu of the Experimental and External Parameters forms
Items Description
Insert Inserts a new empty record in the table.
Delete Deletes current record.
Edit Switches state of the table in edit mode.
Post Saves current record in the Database.
Cancel Cancels changes.
Refresh Refreshes the information in the table. Valuable in multi-user application when several users work with the Database simultaneously.
Sort Sorts the table.
Find Record Allows to set the filter on the table and to search the information by typing the first few characters.
Sort by Parameter Sorts the DataSets table by the selected Parameter.
Sort by Parameter Menu
Sorts the DataSets table (displayed in DataSet panel) by the selected Parameter
Items Description
Ascending Sorts records in DataSets table in ascending order by the selected Parameter.
Descending Sorts records in DataSets table in descending order by the selected Parameter.
Files Panel
Files panel represents all information about the measured data (Observations table) which are related to the current record in DataSets table (displayed in DataSet panel).
An example view of the Files panel is given below:

Each record in the Observations table describes particular measurement and contains such experimental parameters as Sample Position, Start Time, Duration, etc, as well as array of the measured data. Several records from the table Observations are related to one record in the table DataSets and a record from the Observations table may relate to a number of DataSets (relationship "many-to-number"). This relationship reflects the configuration when measurements of the same sample under the same external conditions are being performed in series and some files such as Reference or Scatter may belong to a number of DataSets. In this case, certain number of particular measurements should be collected into one group corresponding to the investigated object.
It is possible to perform all manipulation with Observations table with help of Database Navigator which is placed in the right part of the Files panel. In the bottom part of this panel you can see number of current record, number of all records and current state of the table.
 These buttons allow to create new DataSet from the stored files, import measured data, export stored data to ASCII file, perform a preview of the data and see all files together without separating to a number of DataSets. To find out more about the functionality of any button, click this button on the figure on the left.
Observations table in Files panel can be viewed only in datasheet view.
All actions under Observations table are collected in the local menu.
Button "Import File"
opens the Import file dialog box to import measured data. If the current record in the Observations table is in the edit mode, the stored data will be
overwritten. Otherwise a new record will be created and populated with the imported data. One has to set the type and polarization of the measurement after the import.
Button "Export File"
exports measured data to ASCII file. Opens the standard Save file dialog box to select the file.
Button "Insert
File" is used to append a File stored in
the Database to the Current DataSet. It opens
Observations form to select the file. Use this button if you want to edit the current
DataSet or construct a new DataSets from the already imported (and therefore stored in the Observation table) files. Note, be careful with the integrity of the DataSet. For example, if you add background file to the DataSet you have to check also the Background checkbox in the DataSets panel. All files
within the DataSet must have the same binning time and number of channels, etc.
Button "Import Files by Template"
is used for quick import of files to the current DataSet accordingly to the selected
template. It opens
Import by Template Wizard to select the files.
Button "Edit Default Template" opens Templates Editor form to
select a template, edit existed or create new one.
Button "Preview" opens
Preview Window for two-dimensional preview of the stored data.
Button "All Files" opens
Files Form. In this form all files are displayed together without separating them to series related to particular record in
DataSets table. It allows to find needed files more quickly.
Local menu of the Files panel
Items Description
Insert File Insert the File already stored in the Database to the current DataSet. It opens Observations form to select the file. Actually a new record in the Relation table is created and populated with DataSet and Observation IDs.
Import File Opens the Import File dialog box to import measured data (populates the File field of Observation table). Number of channels is calculated and stored automatically. If current record in the Observations table is in edit mode, the stored data will be
overwritten. Otherwise new record will be created and populated with the imported data. One has to set the type and polarization of the measurement after the import.
Delete Deletes the selected record.
Edit Switches state of the table in edit mode.
Post Saves current record to the Database.
Cancel Cancels updates.
Refresh Refreshes the information in the table. Valuable in multi-user application when several users work with the Database simultaneously.
Export Data Exports measured data to the ASCII file.
Sort Sorts the table.
Find Record Allows to set the filter on the table and to search the information by typing the first few characters.
Preview Opens Preview Window for two-dimensional preview of measured data.
Guests form
This form is used for working with Guests table. It displays all information about person or organization who orders measurements.
An example view of the Guests form is given in the following figure:

All actions under Guests table are collected in the local menu
Main panel represents all fields from
Guests table. It can be viewed as a form view or datasheet view.
Button "Select" closes the form and selects the first record in
DataSets table (represents in DataSet panel in Main window) which correspond to the current Guest in this form.
Button "Close" closes the Guests form.
Button "Help" opens the help window that describes how to work with the form.
Local menu of the form
Items Description
Insert Inserts a new empty record in the table.
Delete Deletes current record.
Edit Switches state of the table in edit mode.
Post Saves current record in the Database.
Cancel Cancels changes.
Refresh Refreshes the information in the table. Valuable in multi-user application when several users work with the Database simultaneously.
Sort Sorts the table.
Find Record Allows to set the filter on the table and to search the information by typing the first few characters.
View Allows to change the view of the table.
Select Selects related record in the main form.
Samples form
This form is used for working with Samples table. It displays all information about samples which were used in measurements.
An example view of the Samples form is given in the following figure:

All actions under Samples table are collected in the local menu.
Main panel represents all fields from
Samples table. It can be viewed as a form view or datasheet view.
Button "Select" closes the form and selects the first record in
DataSets table (represents in DataSet panel in Main window) which correspond to the current Sample in this form.
Button "Close" closes the Samples form.
Observation Files form
This form is used for working with all records of the Observations table without separating them to a number of DataSets.
An example view of the Observation Files form is given in the following figure:

All actions under Observations table are collected in the local menu.
Main panel represents all fields from
Observations table. It can be viewed as a form view or datasheet view.
Button "Select" closes the form and selects this file in Files panel in Main window.
Button "Close" closes the Observation files form.
Parameters form
This form is used for working with PNames table. It displays the names of the external parameters.
An example view of the Parameters form is given in the following figure:

All actions under PNames table are collected in the
local menu.
Parameters grid displays the name of the external parameter (PNames table).
Local menu of the Parameters form
Items Description
Insert Inserts a new empty record in the table.
Delete Deletes current record.
Edit Switches state of the table in edit mode.
Post Saves current record in the Database.
Cancel Cancels changes.
Refresh Refreshes the information in the table. Valuable in multi-user application when several users work with the Database simultaneously.
Sort Sorts the table.
Find Record Allows to set the filter on the table and to search the information by typing the first few characters.
Preview window
This window is used to display data stored in the current record of the Files panel.
Name of the file, name of the DataSet and type of stored data are displayed in the title of this window.
An example view of the Preview window is given below:

Use local menu of 2D Chart for customizing the chart, export chart data to text and BMP files, save, apply and reset user defined settings.
Use Navigator in the bottom part of this window to display characteristics of other files of
the current DataSet.
2D Chart displays data stored in the current record of the
Files panel.
Button "Help" opens the help window that describes how to work with Preview window.
Button "Close" closes this window.
Import/Export Data form
Use se this form to copy the DataSet(s) with all supplementary information (files, parameters, etc.) from one database to another.
An example view of the form is given below:

Source Databases table is used to select the source database.
Destination Databases table is used to select the destination database.
Source DataSets table table is used to select source DataSet(s). It is possible to select many DataSets.
Destination DataSets table table represents DataSets, stored in the Destination database.
Button "Start" starts the import procedure.
Button "Stop" stops the import procedure.
Button "Close" closes the dialog box without performing the action.
Button "Help" opens the help window that describes how to work with Import/Export Data form.
Local menu of the Source DataSets table
Items Description
Refresh Refreshes the information in the table. Valuable in multi-user application when several users work with the Database simultaneously.
Sort Sorts the table.
Find Record Allows to set the filter on the table and to search the information by typing the first few characters.
Select all Selects all records in the source DataSets table.
Local menu of the Destination DataSets table
Items Description
Refresh Refreshes the information in the table. Valuable in multi-user application when several users work with the Database simultaneously.
Sort Sorts the table.
Find Record Allows to set the filter on the table and to search the information by typing the first few characters.
Select DataSets by criteria dialog box
Use this dialog box to select a number of DataSets by different criteria. To combine several selection criteria by logical "And" operation check correspondent checkboxes.
An example view of the dialog box is given below:

Button "Ok"
closes the dialog box and performs selection of DataSets by chosen criteria.
Button "Cancel"
closes the dialog box without performing of any selection.
Button "Help"
opens the help window that describes how to work with Select DataSets dialog box.
Check the IDRange check box if you like to perform the selection by a range of DataSet IDs.
Use the IDRange edits to specify the start
and end DataSet ID
Check the DataSets
name check box if you like to perform the selection by a DataSet name. You can type any part of the name (without any wildcards).
Check the Group name check box if you like to perform the selection by a Group name. You can type any part of the name (without any wildcards).
Check the Date check box if you like to perform the selection by a date of the measurements.
Report Options dialog box
This dialog box is used for customizing the Report and selecting records which will be included into the Report. You can specify Page Setup settings to adjust the printed area.
An example view of the dialog box is given below:

"Filter parameters" page is used for selecting records which will be included into the Report.

Range of date panel
allows to specify the range of dates. You can use built-in calendar by clicking on the small button in right part of Editor.
"Page
Setup" page is used for setting paper size and paper margins for the report.

Button "Ok" closes the dialog box and starts creating the report.
Button "Cancel" closes the dialog box without creating the report.
Button "Filter" opens Filter dialog box
that allows creating the filter that can be applied to the selected table. If this filter is applied, the only table records that correspond to the filter criteria are displayed.
Button "Help" opens the help window that describes how to work with Reports Options dialog box.
Options dialog box
Use this dialog box to set internal variables of Borland Database Engine.
An example view of the dialog box is given below:

Network Directory edit is used to specify the directory that contains the BDE network control file, PDOXUSRS.NET. This file governs the sharing of Paradox tables on network drives. All applications that share Paradox tables on a network directory must specify the same value for this property, and must have read, write, and create rights for the directory.
Private Directory edit is used to set the directory in which to store temporary table processing files for all database connections. For applications that run directly from a networked file server, the application should set PrivateDir to a user's local drive to improve performance and to prevent temporary files from being created on the server where they might conflict with temporary files created by other instances of the application.
Button "Ok" closes the dialog box and set variables.
Button "Cancel" closes the dialog box without setting variables.
Button "Help" opens the help window that describes how to work with
Options dialog box.
New Database dialog box
Use this dialog box to create a new empty Database (set of tables) allowing to keep different data in different folders or even computers within the local network and easily switch between Databases at run time. You must specify the Alias for this Database in Alias edit.
An example view of the dialog box is given below:

Path edit displays selected Directory.
Button "Browse" opens standard Browse Directory dialog box.
Alias edit is used to input new alias.
An alias is a name and a set of parameters that describe a database resource. BDE applications use aliases to connect with databases. If you want to use remote (writing local network) access to the Database you must set the Network Directory (Tools/Options... main menu item).
Button "Ok" closes the dialog box and performs the action.
Button "Cancel" closes the dialog box without performing the action.
Button "Help" opens the help window that describes how to work with New Tables dialog box.
If the Generate new Database Tables radio button is checked, new empty database tables will be created in the specified path. The alias that is pointed to the Database will be created as well.
If the Create new Alias only radio button is checked, only alias that is pointed to the database tables located in the specified path will be created. New empty database tables will not be created.
Link Tables dialog box
Use this dialog box to switch between Databases at run time.
An example view of the dialog box is given below:

Button "Link" closes the dialog box and performs the link with the selected tables.
Button "Help" opens the help window that describes how to work with Link tables dialog box.
Databases (Aliases) panel represents
alias, type and path of all registered databases at the local machine.
Tables panel represents name, date and size of the tables of the database.
Button "Close" closes the dialog box without performing the action.
Select Table dialog box
Use this dialog box to select the table.
An example view of the dialog box is given below:

Button "Ok" closes the dialog box and performs the action.
Button "Help" opens the help window that describes how to work with Select table dialog box.
Import files dialog box
Use this dialog box to import measured data manually file by file. A number of data formats are supported:
1. Row by row. Decay histogram is stored row by row. Values can be separated by space, comma, semicolon, etc. For example:
10 8 13 25 34 58...
150 191 321 803 ...
...
2. One column. Decay histogram is stored in one column.
3. Two columns. Decay histogram is stored in two columns, time and data. Time points must be equally spaced. Values in columns are separated by tabs.
4. Three and more columns. Decay histogram is stored in three or more columns. Values in columns are separated by tabs. One have to select column to import the decay histogram.
Data can be imported in direct and in inverted way.
An example view of the dialog box is given below:

It is a standard Open File dialog with embedded panel of data format selection.
Template editor dialog box
Use this dialog box to set the default template, to preview or edit templates. The template is designed to store the information about the relative position of each file with the given type and polarization.
An example view of the dialog box is given below:

Select the
appropriate template or create a new one.
Import Data Wizards
Import DataSet Wizard
Use this wizard to import a number of files and create a ready for analysis DataSet with all necessary settings.
An example view of the most important pages of the wizard is given below.

Type in fields (Name is required) then click Next button.

Select Guest and Sample in the correspondent tables. Add new Guest and/or Sample if necessary. To do it go the last empty record and fill it with data. Field Description is editable only if you insert a new record in the Samples table. If you do not want to include Guest and Sample information simply do not select any record in the tables (do not click
inside correspondent group boxes). If you already select a record, click Back button then Next button again.

Check necessary checkboxes. It is important step because all other pages of the Wizard depend on these settings.

Choose the type of the analysis (important), either with Scatter or with Reference deconvolution. Type Reference lifetime if Reference is checked.
Type G- and BM- factors in the next two pages.

Select the data format. Drag and drop necessary files to correspondent boxes. Do not mix the files! Take a special care to select necessary files. They can have the same name being located in different folders. It is easy to confuse them in this case.

Type in fields (Time Step is required). The provided values will be used as initial guesses in the analysis. You can change them
later.
Add some experimental and external parameters. To add new name of external parameter use the Add to Pick List local menu item of the External parameters table. It invokes Parameters form.
If the database already contains a file with the name equals to the name of any imported file, the Import
Options dialog is invoked.
If you are sure that the imported file is the same file as the stored one (or exact copy of the stored file) you can link already stored file to the current dataset instead of importing the file once again (see
description of Database scheme). Be careful with this choice. It is easy to confuse files. It is more safety to import files once again with
assignment of different names.
Button "Next/Finish" opens the next page of the wizard. The name of the button is changed to "Finish" on the last page. Finish button closes the dialog box and starts the import.
Button "Cancel" closes the dialog box and discard any changes.
Button "Help" opens the help window that describes how to work with the wizard.
Import
Options dialog box
This
dialog box is used for managing files with the same names while importing. It
prompts to rename the file if file with this name was already stored in the
database. If you are sure that the file is exact copy of the stored file you can
link already stored file to the current dataset instead of importing the file
once again.
An example view of
the dialog box is given below:

Button Ok closes the
dialog box and apply settings.
Button Cancel closes
the dialog box and discard any changes.
Import by
Template Wizard
Use this
wizard to import a number of files and create a ready for analysis DataSet with
all necessary settings. It uses a predefined
template for quick setting of file properties such as Type and Polarization.
An example view of
the most important pages of the wizard is given below.

Type in fields (Name
is required) then click Next button.

Select Guest and
Sample in the correspondent tables. Add new Guest and/or Sample if necessary. To
do it go the last empty record and fill it with data. Field Description is
editable only if you insert a new record in the Samples table. If you do not
want to include Guest and Sample information simply do not select any record in
the tables (do not click inside correspondent group boxes). If you already
select a record, click Back button then Next button again.

Select the
appropriate
template or create a new one. The template is designed to store the information
about the relative position of each file with the given type and polarization.
It is important step because all other pages of the Wizard depend on the
template.
Type Shifts, G- and
BM- factors in the next three pages.

Select the data
format. Select necessary files. The files have to be located in the folder in
exactly the same order as in the selected template.

Type in fields (Time
Step is required). The provided values will be used as initial guesses in the
analysis. You can change them later.
Add some experimental
and
external parameters.
To add new name of external parameter use the Add to Pick List local menu item
of the External parameters table. It invokes
Parameters form.
If the database
already contains a file with the name equals to the name of any imported file,
the
Import Options dialog
is invoked.
If you are sure that
the imported file is the same file as the stored one (or exact copy of the
stored file) you can link already stored file to the current dataset instead of
importing the file once again (see description of
Database scheme).
Be careful with this choice. It is easy to confuse files. It is more safety to
import files once again with assignment of different names.
Import PHD (PicoQuant)
data Wizard
Use this wizard to
import either single or a number of PHD files and form one or many ready for
analysis DataSets with all necessary settings.
An example view of
the dialog box is given below:

Type in fields (Name
is required) then click Next button.

Select Guest and
Sample in the correspondent tables. Add new Guest and/or Sample if necessary. To
do it go the last empty record and fill it with data. Field Description is
editable only if you insert a new record in the Samples table. If you do not
want to include Guest and Sample information simply do not select any record in
the tables (do not click inside correspondent group boxes). If you already
select a record, click Back button then Next button again.

Check necessary
checkboxes. It is important step because all other pages of the Wizard depend on
these settings. Choose the DataSet creation type. A single PHD file can contain
a number of measurements of different type. Therefore it is important to decide
how are you going to create DataSets.
If the Create single
DataSet option is selected, all imported measurements from a number of selected
PHD files will create just one DataSet. Measurements from a separate file will
therefore be summed during the analysis. Thus, it is important that each PHD
file contain measurements of the same type in this case, e.g. repetitions of the
measurement.
If the Create new
DataSet from each Sample decay option is selected, the following algorithm is
used:
1. The measurements
of scatter, reference or background from the correspondent PHD files will be
either summed or averaged (see next pages). The idea is to get just one
measurement of each these type. Thus, it is important that each scatter,
reference or background PHD file contain measurements of the same type, e.g.
repetitions of the measurement;
2. For each sample
measurement imported from the correspondent PHD file new DataSet is created
which is populated with the imported data.
There is also a
possibility to import all scatter, reference or background measurements from
correspondent PHD files. But, in this case, the automatic DataSet creation will
be aborted. User will be prompted to create DataSets manually (which can be done
by insertion of a new record in the DataSets table using
green plus button
in the
Database navigator
followed by appending the imported data using again
green plus button
but now in the Files navigator).

Choose the type of
the analysis (important), either with Scatter or with Reference deconvolution.
Type Reference lifetime if Reference is checked.
If the file contains
several measurements they will be summed or averaged depending on the selected
Add to DataSet option.
Type G- and BM-
factors in the next two pages.

Drag and drop
necessary PHD files to correspondent boxes. Check One file contains all data
check box if one PHD file contains all measurements. You will be prompted to set
the Type and Polarization of each measurements after the import.

Type in fields. Time
Step will be filled automatically. The provided values will be used as initial
guesses in the analysis. You can change them later.
Add some experimental
and
external parameters.
To add new name of external parameter use the Add to Pick List local menu item
of the External parameters table. It invokes
Parameters form.
Import
NColumn Data Wizard
Use this
wizard to import a number of measurements stored in columns in one file and
create a number of ready for analysis DataSets with all necessary settings. See
an example of NColumn data file on this
link. An
example view of the most important pages of the wizard is given below.

Type in fields then
click Next button. To add a new record to fields Guest and Sample click
corresponding button with arrow, fill in the form and press Insert. Text entered
in DataSet prefix field will be appended to the name of each DataSet.

Select a file with
data. The file info displays the status of the file and in the case of right
data format how many DataSets are in the file. You can click Show button to view
the file.

Choose the type of
the analysis (important), either with Scatter or with Reference deconvolution.
Type Reference lifetime if Reference is checked.

Type in fields. The
provided values will be used as initial guesses in the analysis. You can change
them later.
Example of NColumn
data file
Example of file with
two datasets, each with sample, scatterer and background curves (the only first
column of the second dataset is included):
|
TRFA_IC_1.0) |
|
Dataset name |
Name of dataset1 |
Name of dataset1 |
Name of dataset1 |
Name of dataset1 |
Name of dataset1 |
Name of dataset1 |
Name of dataset2 |
|
Dimension |
3 |
3 |
3 |
3 |
3 |
3 |
3 |
|
GFactorSam |
0 |
|
|
|
|
|
0 |
|
GFactorScat |
0 |
|
|
|
|
|
0 |
|
ParBMFactor |
3 |
|
|
|
|
|
3 |
|
PerpBMFactor |
3 |
|
|
|
|
|
3 |
|
ParShift |
0 |
|
|
|
|
|
0 |
|
PerpShift |
0 |
|
|
|
|
|
0 |
|
RefLifeTime |
0.12 |
|
|
|
|
|
0.12 |
|
ParDarkNoise |
0 |
|
|
|
|
|
0 |
|
PerpDarkNoise |
0 |
|
|
|
|
|
0 |
|
ParTUBackground |
0 |
|
|
|
|
|
0 |
|
PerpTUBackground |
0 |
|
|
|
|
|
0 |
|
StartChannel |
100 |
|
|
|
|
|
115 |
|
EndChannel |
1000 |
|
|
|
|
|
1200 |
|
|
|
|
|
|
|
|
|
|
Temperature |
20 |
|
|
|
|
|
20 |
|
Excitation |
465 |
|
|
|
|
|
465 |
|
Detection |
488 |
|
|
|
|
|
488 |
|
PulseRate |
594.5 |
|
|
|
|
|
594.5 |
|
Equipment |
Equip1 |
|
|
|
|
|
Equip1 |
|
… |
|
|
|
|
|
|
|
|
Type |
Sample |
Sample |
Scatter |
Scatter |
Background |
Background |
Sample |
|
Polarization |
Parallel |
Perpendicular |
Parallel |
Perpendicular |
Parallel |
Perpendicular |
Parallel |
|
Duration |
60 |
60 |
30 |
30 |
20 |
20 |
60 |
|
Detection Rate |
|
|
|
|
|
|
|
|
StartTime |
|
|
|
|
|
|
|
|
Range |
|
|
|
|
|
|
|
|
SamplePosX |
|
|
|
|
|
|
|
|
SamplePosY |
|
|
|
|
|
|
|
|
|
|
|
|
|
|
|
|
|
Data: |
|
|
|
|
|
|
|
|
0 |
0 |
1 |
… |
|
|
|
|
|
0.5 |
1 |
1 |
… |
|
|
|
|
|
… |
0 |
0 |
… |
|
|
|
|
|
|
2 |
1 |
… |
|
|
|
|
Requirements:
1. Name of the
dataset must be equal for each dataset (any number of columns with the same
dataset name will be considered as one dataset)
2. Type must be one
of the following: Sample, Background, Scatter(er), Reference
3. Polarization must
be either Not Polarized (or be empty), or Parallel, or Perpendicular
4. Data in the first
column must be case sensitive, other columns can be case insensitive
5. Rows that contain
words in bold are mandatory. Do not modify these words! They are key words.
Underlined words as well as data must be presented in the file.
Time step is
calculated from two first rows of Data section.
Section Dataset
Parameters (between Dataset name and Type rows) can be empty. The parameter that
has not found in the file will be prompted to enter.
Parameters
Temperature, Excitation, … are considered as External parameters. Parameters
like Equipment that can not be converted in floating point value are considered
as Experimental parameters. Number of these parameters can be arbitrary.
Two, three, … columns
can have the same name, type, polarization (they will be summed then).
The column order can
be arbitrary.
Parameter values in
the Dataset Parameters section can be presented either in the first column of
each dataset or in each column of the dataset (latest is required if column
order is arbitrary).
Section Observation
Parameters (between Polarization and Data rows) can be empty. These parameters
are just for information. There are also ResFiels1, ResFiels2 parameter names.
You can use them for writing any necessary information.
Example of the file:
TRFA_IC_1.0
Dataset name gfpbig gfpbig rfpbig rfpbig
Equipment EuroPhoton EuroPhoton
ParShift 1 2
ParDarkNoise 3 5
Temperature 20 25
Excitation 465 465
Emission 488 488
PulseRate 594.5 594.5
StartChannel 595 590
EndChannel 3400 3000
Type scatter sample scatter sample
Polarization not polarized not polarized not polarized not
polarized
MeasurementTime 60 60 30 30
Data:
0 0 0 0 0
0.0109 0 0 0 0
0 0 0 0
0 0 0 0
0 0 0 0
0 0 0 0
Database tables
Observations table
Is used to store information about the measured data. Several records from the Observations table are related to one record in the DataSets table and one file (such as Reference or Scatter) can relate to a number of DataSets (relationship "many-to-number").
Field name Type
Description
ObservationID
Autoincrement Identifies of the record
FileName String Name
of the file
Type String Type of
data (Sample, Scatter, Reference, Background)
Polarization String
Polarization (Parallel or Perpendicular)
FilesGroupName String
Name of the files group
NumChannels Numeric
Number of channels
StartTime Numeric
Start time
DetectionRate Numeric
Rate of detection
Duration Numeric
Duration of measurement
Range String Time
range of measurement
SamplePosX Numeric X
position of sample (parameter of equipment)
SamplePosY Numeric Y
position of sample (parameter of equipment)
File Memo Contains
measured data
Field ObservationID is read only.
DataSets table
Is used to store information related to one group of files. Several records from the DataSets table are related to one record in the Guests table and to one record in Samples table (relationship "many-to-one")
Field name Type Description
DataSetID Autoincrement Identifies of the record.
Name String Name of the DataSet
GuestID Numeric Identifier of the records in Guests table.
Foreign key.
SampleID Numeric Identifier of the records in Sample table.
Foreign key.
Type String DataSet type
GroupName String Name of the dataset group
ObservDate Date Date of measurements
IsPolarization Logical True if dataset contains polarized data
IsConvolution Logical True if dataset contains measurement of reference or scatter
IsReference Logical True if dataset contains measurement of reference
IsBackground Logical True if dataset contains measurement of background
IsMultiExcitation Logical True if measurements were performed in a multiexcitation regime
TimeStep Numeric Bin width in the measured histogram (intensity)
GFactorSam Numeric G factor of sample
GFactorScat Numeric G factor of scatter
ParBMFactor Numeric Background multiplication factor of parallel (or not polarized) measurement
PerpBMFactor Numeric Background multiplication factor of perpendicular measurement
ParShift Numeric Shift between parallel (or not polarized) sample and scatter
decays
PerpShift Numeric Shift between perpendicular sample and scatter
decays
RefLifeTime Numeric Reference life time (for measurements with reference)
ParDarkNoise Numeric Dark noise of detection system in parallel (or not polarized) channel
PerpDarkNoise Numeric Dark noise of detection system in perpendicular channel
ParTUBackground Numeric Time uncorrelated background in parallel (or not polarized) data
PerpTUBackground Numeric Time uncorrelated background in perpendicular data
StartChannel Numeric Start channel for analysis
EndChannel Numeric End channel for analysis
Dimension Numeric Measurements
dimension (2D or 3D).
Description Memo Description of the DataSet
Field DataSetID is read only.
Guests table
Contains information about person or organization who orders measurements.
Field name Type Description
GuestID Autoincrement Identifies of the record
Guest String Name of the person or organization who orders measurements
Address String Address
Organization String Organization
Tel String Telephone
Fax String Fax
Field GuestID is read only.
Samples table
Contains the detailed information regarding the explored sample.
Field name Type Description
SampleID Autoincrement Identifies of the record
Sample String Name of the sample
Description Memo Description of the sample
Field SampleID is read only.
Experimantal
parameters table
Is used to store the equipment parameters. Several records from the Parameters table are related to one record in the DataSets table (relationship "many-to-one").
Field name Type Description
ParameterID Autoincrement Identifies of the record
DataSetID Numeric Identifier of the record in DataSets table.
Foreign key.
Name String Name of the parameter
Value String Value of the parameter
Field ParameterID is read only.
External parameters table
Is used to store the external parameters. These parameters are used for displaying dependence of estimated parameters (Estimated parameter versus External parameter). Several records from the External parameters table are related to one record in the DataSets table (relationship "many-to-one"). While entering the parameter it is necessary to add the parameter name to the PNames table.
Field name Type Description
ParameterID Autoincrement Identifies of the record
DataSetID Numeric Identifier of the record in DataSets table.
Foreign key.
Name String Name of the parameter
Value String Value of the parameter
Field ParameterID is read only.
Field Name is the lookup field. It lookups the information from the PNames table.
PNames table
Is used to store the external parameter names. It is created in order to avoid mistakes while entering external parameter names. At the beginning it is necessary to add the parameter name to the PNames table then this parameters can be chosen from drop-down list in the External parameters page of the Parameters panel.
Field name Type Description
Name String Name of the parameter
Field ParameterID is read only.
Relation table
Contains pairs of dataset and observation identifiers (IDs). Is used for
maintain many-to-number relationship between DataSets and Observations tables.
Field name Type Description
DataSetID Numeric Contains ID of the record in the DataSets table.
Foreign key.
ObservationID Numeric Contains ID of the record in the Observations table.
Foreign key.
This table is hidden. To edit it use database navigator in the Files panel. Insert File button inserts a record into Relation table and populate it with DataSet and Observation IDs. Delete button deletes the record in Relations table.
Notes
•
All tables can be sorted by any field. To perform the sorting by the given field, select this field and press Ascending/Descending Sort button in the Toolbar or choose Ascending/Descending menu items in the local menu.
• Use Quick Search button in the Toolbar or choose Quick Search menu items in local menu for quick searching the information in the selected field.